Thursday 31 March 2016

Patisserie Valerie

We heard Patisserie Valerie were selling gluten free goods... so next time we were near a store we bought a few goodies to try:- a ginger biscuit, chocolate brownie and a chocolate chip muffin. These all arrive in store pre-packed from a dedicated bakery and sell at £2.10 to take away.  Also spotted on sale was a macaroon, displayed unwrapped, and with no gluten containing ingredients we gave this a go (but J refused).

The Ginger biscuit was crisp but not too hard and had a lovely gingery flavour.  

J wolfed down the chocolate brownie in no time... so I didn't get chance for a taste.  He said it was "a brownie" so suppose that's good!!


I managed to get a small morcel of the Choc Chip Muffin.... it was nice and moist and, despite this pic, was not crumbly.

I also tried a macaroon... with a lovely moist almondy centre and a crisp outer.  It's no pre-wrapped and is not labelled as gluten free but has no gluten containing ingredients.  Our server got a fresh biscuit out for me rather than taking one from the display (which is open and thus could be a cross contamination risk).

We will definitely return to try more of the gluten free offerings and were pleased to hear there's also a "celebration cake" that can be ordered.  So perhaps this year I won't have to make my own gluten free birthday cake?!
Choc Chip Muffin label

Tuesday 29 March 2016

Marks and Spencer Made Without Wheat Victoria Sponge Cake Mix

We picked up a packet cake mix in Marks and Spencer - J's always been a fan of Victoria Sponge and he thought he'd "give it a go".  It's from their Made Without Wheat range and required the addition of two eggs, some melted butter and milk.

Gathering the ingredients and equipment that would be needed to bake the cake, Sous Chef J was keen to follow the mix's instructions
to the (rather small) letter.

Having greased and lined the baking tins, SCJ started by sifting the flour mix from the bag into a large mixing bowl.

Next the milk and eggs were lightly beaten together and added to the flour mix.

Melting the butter, this was then allowed to cool slightly before being added to the cake mix.


The batter came together well and was quite thick but easily mixable with a silicone spatula.


The mix was shared between two 6" sandwich tins (SCJ used scales to ensure even distribution) and then baked according to the instructions.

Once baked thoroughly, the cakes were removed from the oven and allowed to cool completely on a cooling rack.

Raspberry jam was then spread on the top of one of the cakes.  SCJ used a small silicone spatula to do this.

Finally, whipped cream was added, the other cake was placed on top and it was covered with a dusting of icing sugar.

The cake was moist, light and very tasty.  It didn't last long!  We'll definitely buy the mix again... so long as supplies are on the shelves, that is.

Wednesday 9 March 2016

Cinnamon Buns

These buns were made using one quantity of enriched dough from the Pain an Chocolat Fingers recipe we blogged earlier

For the filling of the buns we used -
80g soft brown sugar
1 Tbsp cinnamon
40g unsalted butter, melted (or use melted dairy free spread)

First of all, we greased a 19cm square baking tin well (we used old butter wrappers for this but you could brush with oil if you don't have them or want a dairy free bake).

The dough was made up according to the recipe, then brought together, lightly, on a very well floured silicone sheet.  It was then placed in an oiled bowl, covered with oiled cling film and placed in a warm place for an hour (we used the airing cupboard's top shelf).

Once proved, the dough was rolled (again on a very well floured silicone sheet) into a large rectangle.


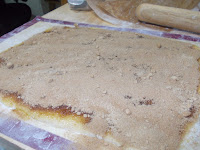
Next we brushed the surface of the dough with the melted butter and then the
sugar/cinnamon mix was sprinkled across.

We rolled the dough up from the longer side (using the silicone sheet to help), and it was formed into a "Swiss roll" before being cut into 9 even(ish) slices. 


The slices were then packed into the square baking tin, covered with the oiled cling film and placed back in the airing cupboard for a further hour.


Preheating the oven to 160ºC fan, the uncovered baking tin was placed on the middle shelf and baked for about 25 minutes.  Checking the buns to see how they were baking at this point we decided they could do with a little more time (but this depends on oven and thickness of buns). 
Removing the buns from the oven, they were allowed to cool for about ten minutes and then turned out onto a cooling rack.

The buns were then drizzled with a water icing made up using about 30g icing sugar and a scant teaspoon of warm water to make a paste.

They buns were spicy, sweet and soft... delicious and, even allowing for all the proving time, are well worth the effort.


Sunday 6 March 2016

Pain au Chocolat Fingers


We were sent a Gluten Free magazine ... not something I usually spend £5 on as, to be honest, find the content is mostly lifted from blogs and rarely do the pictures reflect the actual recipes baked.  A case in point is the 'photo' chosen to accompany the Pain au Chocolat recipe we spotted and decided to have a bash at baking... the photo on the facing page looks very much like a 'stock' image of glutenous pains au chocolat... a giveaway is the fact that the method of rolling the pains is NOT that advocated in the recipe!

Anyway, enough of the background and our rambling thoughts... time to tell you how we made the 'enriched dough' Pains au Chocolat Fingers (our name for them, having made them).

Ingredients needed were already in the cupboards here.

175g bread flour (we used Dove's farm gluten free which includes xantham gum - of yours doesn't you'll need ¼tsp xantham gum)
2¼tsp fast action dried yeast
50g caster sugar
2tsp baking powder (we used Dr Oetker gluten free)
50ml olive oil
50ml warm water (you may need more)
1 medium egg
1tsp vanilla extract
100g dark chocolate chips (we didn't use them all in the end)

To glaze - one egg yolk, 1 Tbsp milk.

The oil, water, egg and vanilla were mixed in bowl.

Next the dry ingredients were added, a spoonful at a time, and dough hooks were used with the hand mixer to incorporate
throughout the dough. 


After 5 minutes of mixing, the dough was starting to come away from the sides of the bowl.

Placing the dough on a very well floured silicone sheet, it was lightly worked to form a long rectangle before being cut into 10 pieces.

Each piece of dough was then rolled lightly (again using a lot of flour) into a rectangle of about 15x10cm.  The edges were then brushed with the egg/flour mix and chocolate chips were placed in a line along each of the short edges.

Rolling the dough up from short edge to middle, from each side, the shape became more like a finger.

Next, the rolled up buns were put on a non-stick baking sheet, and  covered with an oiled piece of cling film before being put in the airing cupboard for 45-50 minutes.

Once they'd risen a little, the buns were brushed with the remaining egg/milk mix and baked in a pre-heated oven (170ºC fan) for 10 minutes when they were checked (this will vary depending on size).  They were removed from the oven when they were a golden brown.
Some were eaten fresh, the remainder heated for breakfast the next day using the toaster's warming rack.  They freeze well and can be reheated using the toaster from frozen.