Showing posts with label Chocolate. Show all posts

Saturday, 9 December 2017

Chocolate Brownie Christmas Pudding Kit

We were pleased to see a range of different ideas in the Christmas section at Tesco... this #glutenfree Chocolate Brownie Christmas Pudding Kit caught our eye (particularly as it was on offer at £2.50!)
Checking out what was needed to use the kit, it was good to see that it wasn't a huge list of non-standard things.  So, we picked out the pyrex bowl, found the greaseproof paper and weighed out the butter (uses 100g, melted or use dairy free spread) ... before adding it to a large, beaten egg and 20ml water.

These were mixed lightly (we used a fork) and then added to the 'dry' ingredients and thoroughly mixed.

Having greased and lined the 0.5l pyrex pudding bowl, we added the mix and levelled the top.


The brownie pudding was then microwaved... the instructions mention 800W strength but the microwave we were using was only 700W so we lengthened the cooking time.

Once done, the pudding looked (and smelt) pretty good!
Whilst the pudding was being cooked, we made up the icing by adding 2 tsp (10ml) water to the icing sugar and mixed it well (we used a mug for this).

The pudding was allowed to cool in the bowl for about 20 minutes before it was turned out onto a plate and the greaseproof paper was removed (easily).

Next, we poured the icing over the top...

 .... and then added the holly sprinkles (a generous portion!) before we dived in to try.

It was a huge success and definitely something we all enjoyed (though our portions served 6 from the kit, not the 8 the packaging mentions)


Saturday, 5 November 2016

Speedy Choco Nut Rolls

Using half a pack of Silly Yak Foods gluten free puff pastry, these speedy pastries were made.

Ingredients were -

Half a pack of puff pastry
Tablespoon of Nutella, warmed
Heaped tablespoon of macadamia nuts, roughly chopped (hazelnuts could be used instead)

On a floured silicone sheet, we rolled out the puff pastry to approximately 25cm by 20cm.

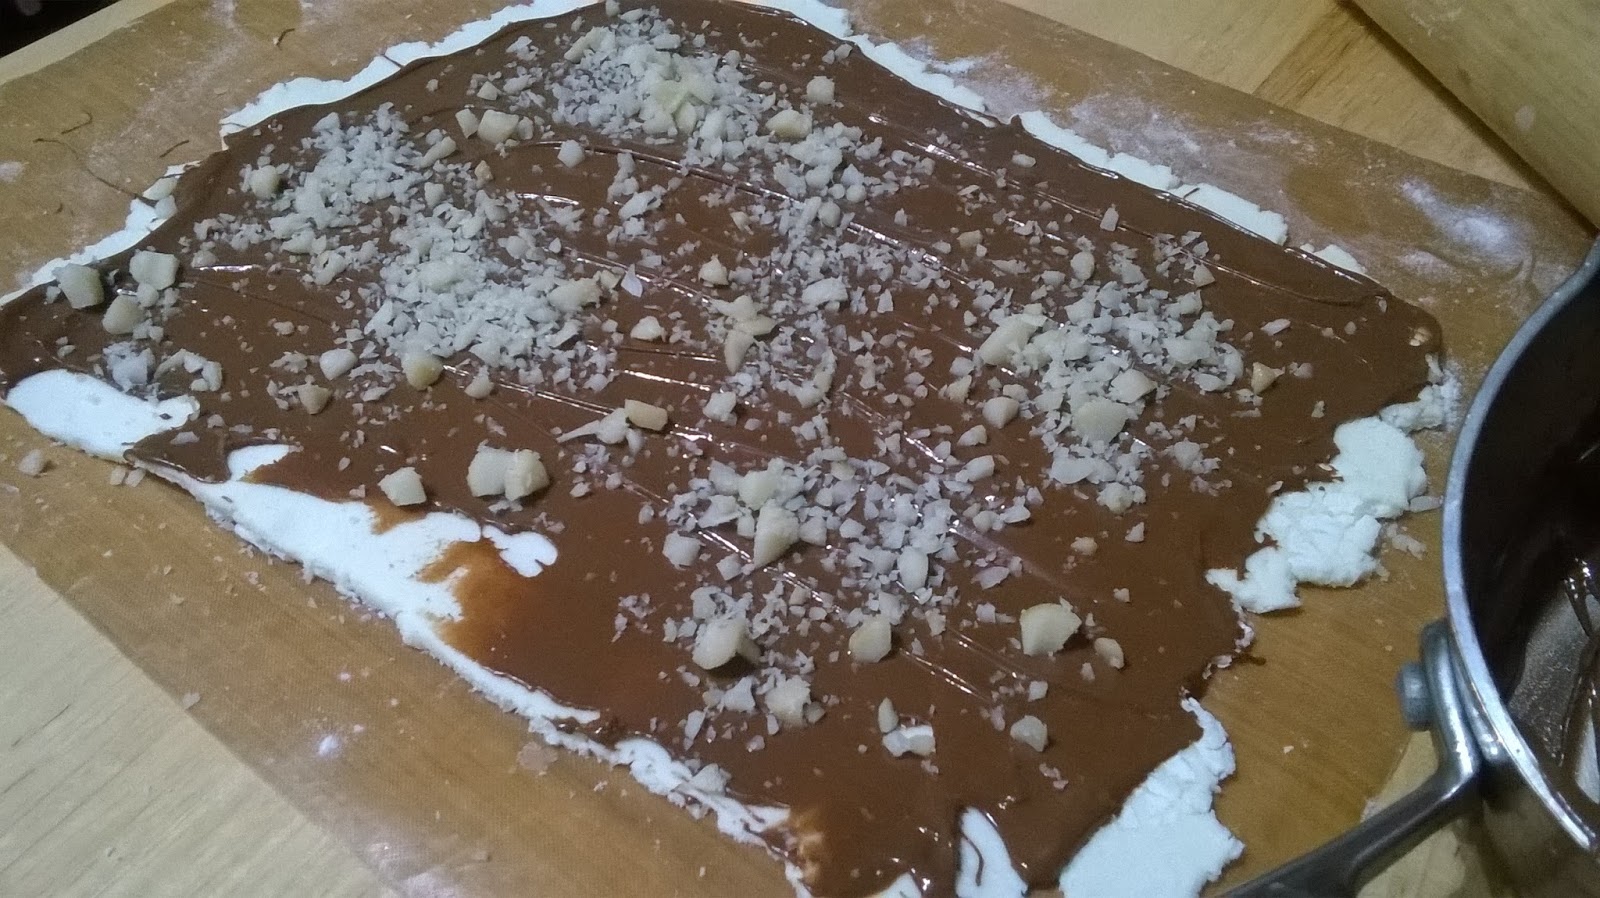
Next the warmed Nutella was spread over the pastry.

The chopped nuts were sprinkled over.


Finally, using the silicone sheet to assist, the pastry sheet was rolled (from the long edge) into a long
tube.

This roll was then sliced into 8 pieces and these were placed on a non-stick baking sheet, cut side down.

The baking sheet was put in a pre-heated oven (175ºC fan) and baked for 12-17mins (check for browning and ensure pastry is cooked)

We allowed the rolls to rest on the baking sheet for about 5 minutes once out of the over.  They were then removed to a cooling rack to completely cool.

A tasty and speedy treat... which won't last long but if you need to store them, make sure they're in an airtight container. 

Sunday, 27 September 2015

Simple, surprising, Chocolate Mousse

Having spotted a recipe of Lorraine Pascale's that looked interesting, we decided to give it a go.

As is usual for us, we didn't have *quite* the right ingredients so made a couple of minor tweaks.  However the recipe remains gluten free, dairy free, added sugar free and egg free.  Plus, it's a one pot 'whiz up' mix which is an added bonus!

The ingredients we used were -

One ripe banana, peeled
One ripe avocado, peeled and stone removed
62g dates, with stones removed
42g unsweetened cocoa powder

(this made enough for three quite large servings)

The banana and dates were put in a food processor, they were whizzed to combine and then the avocado was also added.

Finally, the cocoa powder was added and mixed until all ingredients thoroughly combined.

Splitting the mousse between three serving dishes, they were then cooled until it was time to eat them.  Having a smooth texture, they were very chocolatey and not too rich.  A lovely end to our meal.  Really simple to make and not as bad for you as other chocolate puddings!

Sous Chef J has suggested adding coffee to them the next time we make them - the finely ground instant coffee beans type - and we think the addition of a teaspoon of this will create a lovely rich mocha dessert.

Tuesday, 9 December 2014

Chocolate Pine Cones


Following on from our previous post, Sous Chef J and I have been thinking of 'different' edible decorations and came up with the idea of "trying to fashion" pine cones using chocolate buttons.  Knowing that pine cones show the Fibonacci spiral and thinking about 3- & 5-fold radial symmetry seen alot in nature,  we decided to give it a go...

As usual, we started by deciding on the ingredients (materials) to use to make our chocolate pine cones.  Sous Chef J decided the pine cone would need a 'centre' and thought a curly wurly would be good for this.

Cutting down a curly wurly into shorter pieces, we had the centre ready to be used.  (A note of caution, if the curly wurly is too cold, the internal toffee tends to shatter)
We used melted chocolate chips as the cement/glue to stick the buttons in place.

Using the same technique as we did for making our Rudolph Heads, we placed chocolate chips in a small plastic bag, which was then put in hot water to melt them, before cutting off one corner of the bag.  This was then squeezed out where needed to stick the buttons together to make the pine cone shape.

Next, the assembly of the pine cone could begin.  Three buttons were placed on a piece of card, a blob of chocolate was added and the curly wurly upright was held in place.  Then layers of buttons were added, around the upright, with more melted chocolate to make a cement.  This was repeated, building up the spirals of the pine cone.
Finally, the cone was ready!  We're quite pleased with the result.  We made a large cone using Giant Cadbury buttons and a few smaller cones using standard sized buttons.

The cones were bagged up in cellophane wrappers and will be given as gifts (if they last long enough!!)


Friday, 5 December 2014

Rudolph Heads

We had a lovely morning thinking about and making seasonal chocolate snacks.  More to follow in a later post... but, for now, here's our idea for an intricate but fun Rudolph-styled chocolate. 

First of all, we started by melting some white and milk chocolate chips in small plastic bags.  Once the chocolate was melted, a corner of the bag was cut and the chocolate was 'piped' onto some baking parchment in antler shapes.  These were then put in the fridge to chill and set.

At this point, it's worth mentioning that the white chocolate antlers were far from successful so we were not hopeful of a positive outcome when trying to use them!

Whilst the antlers were setting, we took a chocolate log chocolate truffle (ours were pre-packed Alpinis from Thornton's which state 'no gluten containing ingredients' but realise the cross contamination risk may be too great for coeliacs) and put a small dab of chocolate on one end.  We then placed a small, red sugar decoration on the chocolate to serve as Rudolph's nose.


Next was the tricky task of antler attachment.  Placing the truffle log on end, a generous blob of chocolate was put on the end and two, now solid, chocolate antlers were attached.


Adding some silver balls as eyes, using dabs of chocolate as glue, we had created our Rudolphs.

We won't suggest this is anything other than a fiddly undertaking but Sous Chef J had fun and we were both pleased with the results!

They'd make a lovely gift or sweet treat with a coffee or cuppa.

Saturday, 8 November 2014

Choc chip cookies

Sous Chef J is very partial to the Honeybuns bakery Triple Chocolate Tinker cookies and this is our attempt to re-create them.  We do have the Honeybun's cookbook but, being the details chap J is, he noted the recipe in the book does not contain the same ingredients as the bought cookies (the recipe contains oat flour and oats whereas the bought cookies contain ground almonds).  It is the bought ones, with ground almonds, Sous Chef J likes for elevenses so that's the type of cookie we're aiming for.

Tweaking a chocolate brownie recipe, the ingredients we used were -

100g Dark chocolate pieces
100g Unsalted butter
150g dark soft brown sugar
150g caster sugar
2 beaten eggs (we used medium ones)
¼ teaspoon salt
1 teaspoon vanilla extract
150g ground almonds
50g chocolate chunks

We started by melting the chocolate and butter over a pan of simmering water, they were mixed thoroughly together and then the sugars were added.  

At this point, the beaten eggs were added one at a time and combined well.

Next, the vanilla extract was added and stirred in.

Adding the ground almonds it's important to make sure they're completely mixed through. 

Finally, the chocolate chunks were added.


Placing dessertspoonfuls of the mix on a non-stick baking tray, the cookies were baked for about 6 minutes in a 170ºC fan oven.

Be careful to ensure the blobs of mix are well spaced... this will spread!

We watched the cookies quite closely as it depended on the amount in each as to how quickly they cooked.  Once cooked at the edges, the cookies were removed, and allowed to cool on the baking tray.

As soon as they were cool enough to lift off the baking sheet without bending, the cookies were put on a cooling rack to completely cool.

We made 6 cookies (about 10cm diameter) and a small tray of brownies using the ingredients above.

The brownies were cooked until a knife inserted in the centre of the aluminium tray came out almost clean.


This recipe results in cookies with a crisp outer and squidgy inner.  The brownies are fudge-like in the centre.

It is not a recipe for those counting calories!  Bagged up individually, the cookies freeze well and we cut up the brownies into small squares and freeze them for later...

Wednesday, 15 October 2014

Pinwheels, Twists and Marbled Biscuits

Having seen Mary Berry make some simple two tone biscuits on the TV, we decided to give it a go with some gluten free biscuit dough.

Making up a batch of standard biscuit dough, (200g caster sugar, 200g unsalted butter, creamed, then one egg added and mixed through).  We split it in two after the egg was incorporated.  To one half we added 200g plain flour (we used Dove's Farm gluten free) and to the other we added 150g plain flour and 50g cocoa powder.

The doughs were then brought together using the electric mixer before being pulled into a ball by hand.

The two doughs were rolled out carefully (we used a silicone sheet to stop sticking but clingfilm could also be used if that is what you have to hand.) 
Once rolled, we laid two small sheets of dough one on top of the other and rolled it, carefully, into a long tube - this would be used to form the pinwheel biscuits

After chilling the dough 'roll' for about 15 minutes (whilst we got on with making biscuit twists) we sliced the dough roll into discs.

Each disc was just less than 1cm in thickness and was carefully placed on the non-stick baking sheet.

The twists were made by cutting thin lengths of the bi-coloured dough (we used a rule and pizza wheel), twisting slightly and placing directly onto a non-stick baking sheet ... making sure to push the ends down to stop them unravelling during cooking.


Mary Berry suggested making marbled biscuits with the left overs... and this is what we did too!  They're really simple.  By combining the leftovers of the doughs, we rolled out, used a cutter and put the biscuits on a baking sheet.


The biscuits were chilled until ready to be baked in a moderate oven (170ºC) for 8-12 minutes (you need to keep an eye on them because varying sizes mean they cook at differing rates)

Once cooked, we allowed thebiscuits to cool for a short while on the baking sheets before transferring to a wire rack to cool completely.  Then they were ready to be stored in an airtight container for eating later... next time we'll make the twists a little shorter so they fit in our pots.