Showing posts with label traybake. Show all posts

Monday, 22 February 2016

Cajun Chicken traybake

We saw this recipe in Waitrose as part of the suggested meals during January.  It's taken us until February, but we've made it!

The ingredients we used were -
400g chicken thighs, skinned
1 red onion, cut into chunks
3 carrots, halved and cut into thick slices
500g sweet potatoes, peeled and cut into chunks
25g walnut pieces, roughly chopped (these can be omitted)
1 tbsp Cajun seasoning
1 tbsp olive oil
2 tbsp runny honey

Having prepared the vegetables and chicken, they were placed in a roasting tin.

In a jug, we mixed the Cajun seasoning, oil and honey together and seasoned with freshly ground black pepper.


The seasoning mix was then drizzled over the chicken and vegetables.

Placing the tin in a pre-heated oven (180ºC fan) the dish was roasted for 30 minutes when we checked the chicken was cooked through (by inserting a fork and seeing if the fluid ran clear).  We also checked to see that the vegetables were tender.  We like to be sure chicken is properly cooked, so returned the dish to the oven for a further ten minutes whilst we prepared the accompanying sweetcorn and peas.


We liked the recipe and agreed it would work well as a slow cooker meal, and other vegetables like small potatoes could also be added to the mix.

Sunday, 25 October 2015

Pineapple upside down cake

Sous Chef J has been wanting to try making a Pineapple Upside Down Cake for ages.  Last week I bought a couple of fresh pineapples (one medium and the other HUGE sized).  So, when they had ripened and we were looking for inspiration on a chilly afternoon, he suggested the cake.  We searched for a suitable recipe to follow and came up with this slightly tweaked amalgam recipe -

For the topping -
50g softened butter
50g soft brown sugar
1 medium pineapple, peeled, cored and sliced (we reserved the juice from this undertaking for later use) - if you don't have fresh, then tinned pineapple rings in juice will be fine.
For the cake -
100g softened butter
100g golden caster sugar
100g self-raising flour (we used Dove's Farm gluten free SR Flour)
1 tsp baking powder (we used Dr Oetker gluten free)
1 tsp vanilla extract
2 large eggs
We set the oven to 160C fan and prepared the topping.  To do this, we beat the butter and sugar together until creamy. The topping mix was then spread over the base and a quarter of the way up the sides of a 21cm round spring-form cake tin. 


The pineapple was prepared using an Oxo Good Grips pineapple
device... it was a two person job but we were pleased it worked well.  Next, Sous Chef J arranged 4 pineapple rings on top of the butter/sugar mix. 


Placing the butter and sugar in a bowl, we used an electric hand mixer to cream them together.  The eggs were add, one at a time, before including the flour and baking powder.  The mix came together nicely and looked creamy and light in colour.  We then mixed through about 2 Tablespoons of the reserved pineapple juice and made sure it was fully combined to a soft consistency. 


The cake mix was put into the tin on top of the pineapple and smoothed. 
We baked the cake, having placed the tin on a baking sheet (as the springform tin leaked - use a tin without a loose bottom if you have one!  We learnt from this for subsequent bakes) for 35 mins. 
Having left the cake to cool for 10 minutes, it was turned out onto a platter.

Sous Chef J has developed a liking for helping with "cook's reward" activities and is keen to assist with "checking the mix tastes OK".


We have also repeated this recipe making a square traybake cake (pics show both baking sessions) and Sous Chef J's "Singular Pineapple Upside Down Tarts" ....they were fab and are the header pic.


Wednesday, 15 April 2015

Rhubarb and Custard Traybake

Flicking through the Waitrose Spring Harvest 2015 booklet, Sous Chef J spotted a few recipes he "liked the look of" and, having read the ingredients, we decided we could make the bakes, with a few 'tweaks', gluten free.  This Rhubarb and Custard Traybake recipe tweak required us to use Dove's Farm Gluten Free self raising flour instead of the gluten containing 'stuff'.

400g rhubarb, trimmed and cut into 2cm lengths
225g caster sugar
250g slightly salted butter, softened, plus extra for greasing
3 medium eggs
175g self-raising flour (we used Dove's Farm gluten free)
50g custard powder (we used Bird's)
100g ground almonds
500g tub Waitrose Seriously Creamy Madagascan Vanilla Custard
12 sugar cubes, crushed (we used Pearlsugar)


Preheating the oven to 220C, we prepared the rhubarb by placing it on a non-stick baking sheet, sprinkling with 25g of the caster sugar and baking for about 15 minutes until it began to soften. 

Reducing the oven temperature to 170C (fan) we then began making the base of the traybake.


The remaining 200g of the caster sugar, softened butter, eggs, flour, custard powder, ground almonds and 100g of the custard were mixed together (we used an electric hand mixer).  This produced quite a firm mix and we brought it together, scraping around the bowl, using a silicone spatula.

Having prepared a shallow, non-stick 23cmx33cm baking tray by greasing it (we used the wrapper from the butter) and lining with baking parchment, we were ready to add the 'base' of the traybake.


Spreading the base mix out as evenly as possible, a dessertspoon was used to press into the mix and make 'wells'...


... which were then filled with the remaining ready-made custard.

Spreading the cooked (and cooled) rhubarb over the base, the traybake was ready to be baked.

We checked the traybake after 30 minutes at 170C and left it in the oven for a further 15 minutes - until the sponge was firm and the custard still had a bit of a wobble.

Taking the traybake out of the oven, it was placed on a wire rack and left to cool in its tin.... we sprinkled over a tablespoonful of pearlsugar (Scandinavian sugar).

The cooling traybake looked impressively like the one in the recipe we were following.

Once the traybake was fully cooled, we cut it into 15 pieces and were pleased that it stayed together nicely.  The sponge base was lovely and soft but kept its shape.  Finding the pockets of custard, now firm and unctuous, with the tart rhubarb topping gave each portion a lovely range of tastes and textures.


NOTE - we made this bake again this weekend but used two smaller trays... it was a huge success.

Saturday, 19 May 2012

Sticky Date and Walnut Cake with Maple Syrup Icing

This is a recipe from the Waitrose website that we printed out a L-O-N-G time ago.  Finally, today, we got around to making it.

Ingredients used were -
250g dates, chopped
150g butter, softened
100g soft brown sugar
4 Tbsp (60ml) maple syrup
250g Plain flour (we used Dove's farm gluten free)
2 eggs, beaten
1½ tsp baking powder (we used Dr Oetker gluten free)
1½ tsp mixed spice
50g walnuts, chopped
125g icing sugar, sifted

Having chopped the dates, they were placed in a bowl and covered with 150ml boiling water.  Whilst they were soaking, we prepared the rest of the ingredients and preheated the oven to 170C (fan).

The butter and brown sugar were beaten together until creamy.  Half of the maple syrup was added and mixed through.  Then, the flour and eggs were added a little at a time and fully incorporated.

After this, the mixed spice and baking powder was added and stirred through thoroughly.  Once this was done, we added the dates (and the soaking water) and two thirds of the chopped walnuts.  Again, the mix was thoroughly stirred.

The mix was then shared between metal baking tins which had been well greased.  A traybake tin, about 25cmx17cm, and a small loaf tin (10cmx7cm) were used. 

These were then baked in the pre-heated oven for 40 minutes when they were tested using a knife to see if they were cooked through.  Once the knife came out clean, the tins were placed on a cooling tray and, after about 10 minutes, the cakes were removed and left to cool fully.

Whilst the cakes cooled, the icing was made by mixing the icing sugar, remainder of the maple syrup and a small amount of warm water to get a runny mix.  This was then drizzled over the cakes and the remaining chopped walnuts were sprinkled on top.

Tuesday, 7 February 2012

Nutty Chocolate Traybake

 
 Whilst on what seems like a regular rummage through the many recipes we have, we spotted a printout from Delicious Magazine called "Gluten-free nutty chocolate traybake recipe". A quick scan of the ingredients and we realised we actually had all the items required... so, the plan to make them was feasible.
Sous Chef J gathered together the following:-
100g dark choc chunks
3 med eggs, separated
70g caster sugar
75g ground almonds
1 teaspoon fresh ground coffee (we used the innards of a one cup coffee bag!)
25g pecans, chopped
The ground almonds, chopped pecans and coffee were put in a bowl.   

Next, the egg yolks and sugar were mixed til light and creamy.  Whilst this was happening, we melted the choc chunks over a bowl of boiling water. 
Once the chocolate was melted it was mixed into the sugar/egg and the dried ingredients were added as well.

After the egg whites had been whisked to stiff peak state, they were combined with the chocolate mix.  Combining the egg white gently by folding it in resulted in a similar mix texture to that of a roulade.

Pouring the mix into a greased and lined baking tray, it was then placed in a pre-heated oven at 170C for 12 minutes when it was checked (we used a larger tray than recommended in the recipe so the mixture was thinner). Having checked the surface still had a spongy feel, the cake was removed from the oven and left to cool in its tray.

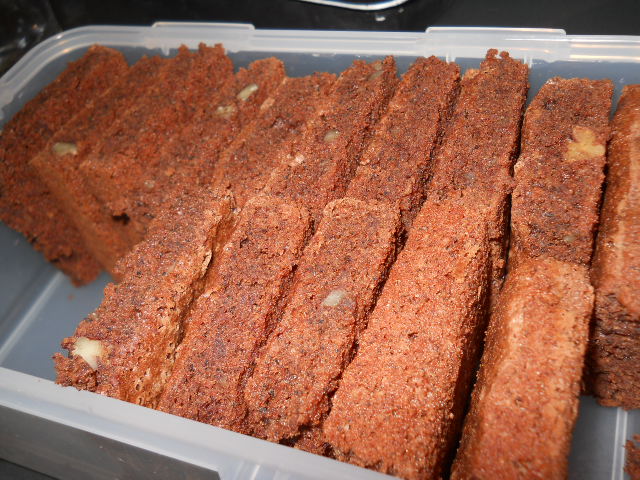
Once cooled, the traybake was turned out, sliced and stacked for storage.
It has a light, spongy texture and is good as a snack with a cuppa or be great as a dessert with creme fraiche, cream or vanilla icecream.  Even though it's been packed for storage, it won't last long here!

Wednesday, 12 October 2011

Chocolate Cake Creations

Following on from our Great British Bake Off viewing, Sous Chef J had an idea for a chocolate cake creation.  Seeing as we were already making a victoria sponge cake from scratch, we decided to try out a packet of Glebe Farm Gluten Free Chocolate Cake Mix.  We had the mix, the required eggs and butter so it seemed a good idea to see how we got on.

175g of butter (dairy free margarine can also be used) was melted in a stainless steel bowl over a pan of boiling water.  The bowl was then placed on a tea towel on the work surface.


The cake mix and the three eggs were added, one at a time, whilst the mixture was whisked.  Once fully combined, the mix was divided between a greased baking tray and six mini muffin cases. These were then placed in a pre-heated (170º fan) oven.

Having checked the mini muffins after 10 minutes, it was decided they were "done" so we took them out of the oven left them to cool.  The larger cake was baked for another 10 minutes before being removed to cool for 10 minutes in its tin.  It was then turned out to fully cool.

As Sous Chef J was keen to try another style of small cake making, rounds were cut from the rectangular cake. He chose chocolate hazelnut spread (Sainsbury's own brand worked very well!) as the filling and this was piped onto the bases. The tops were then added and a 'rosette' was the final decoration!


The final offerings were presented very nicely by Sous Chef J... and the mini muffins were frozen, individually, for day out treats.
All in all, the Glebe Farm Gluten Free Chocolate Cake Mix was easy to use and provided a good outcome for Sous Chef J's creations. 

These have been declared the family birthday cake design of choice as the lack of rise in the gluten free sponge is nicely counterbalance by the small cakelet design!

We've saved all the off cuts of sponge and will be attempting cake pops sometime soon.