This is a variation on a family recipe that my mother has used since the 1970's. No idea where it came from but it's a staple as far as we're concerned. We gathered the ingredients together... as ever, there are not too many in our recipe.
To make enough to fill our shaker, we used one garlic clove, one teaspoon of Dijon mustard, one teaspoon of runny honey, 100ml rapeseed oil and 100ml vinegar.
 To make the dressing, we put 1 teaspoon of dijon mustard (check it's gluten free) and a teaspoon of runny honey in the bottom of the shaker. Then, the garlic was peeled and sliced before being crushed with a little sea salt. This was also added to the shaker.
 Next, we added the rapeseed oil and vinegar (we use white wine or cyder vinegar) as well.
Having added all the ingredients to our trusty salad shaker, they looked like this... Sous chef J was then in charge of holding the lid on and shaking and
 ... this is what we got!
Served over green salad, with avocado, on sliced tomatoes or mushrooms. It is delicious and keeps well.
Store in the fridge and shake well before serving.
If you don't have a shaker then a jam jar will work just as well... and a screw top lid's probably a better idea than the push in type of lid our shaker has!
 OK, so this is a bit of a "make it up as we go along" recipe. When there are eggs that need using up, this is the recipe of choice for us. The principle is the same each time we make this but amounts and timings have to be adjusted depending on number and size of eggs being used, runniness of yoghurt and amount of cheese... It's definitely worth cooking but you need to keep an eye on what's going on in the oven.
The ingredients used this time were two onions, which had been sliced, two large eggs, beaten, about 400ml natural yoghurt and lots of grated mature cheddar cheese. Plus seasoning to taste and sunflower oil for cooking and oiling the dish. As mentioned above, this is a dish that is cooked when the eggs we have are about to go out of date... so we may use three medium eggs, two large eggs or more... depending on the supply situation!
First of all, the sliced onions were cooked in sunflower oil over a medium heat until they are starting to cook through (we usually use red onions).


Whilst the onions were cooking, we mixed together the eggs and yoghurt then added in the grated cheese - sous chef J seasoned well with freshly ground black pepper (using his own 'special' pepper mill). His next task was to oil the pyrex dish we cook the quiche in. Sunflower oil is used for this and he spreads it over the base and up the sides using a silcone 'brush' like utensil from Ikea.


After oiling the dish, a thin layer of the egg, cheese and yogurt mix was added... and spread out evenly. This was then covered with the onions.
 Finally, the onions were covered with the remainder of the egg, cheese and yoghurt mix and the dish was placed in the preheated oven.
 After cooking in the oven at 180ºC (for about 25 minutes with this amount) we ended up with this...

After allowing it a little time cooling in the dish, we carefully served (we use a fish slice). We enjoy our quiche with any/all of salad, potato wedges, steamed vegs... or you can try whatever takes your fancy!
 The quiche can be cooled fully, stored in the fridge and sliced for picnics. It freezes well for a short time too.
 Having finally been to the Feeding Clinic last week, we were dismayed to find that it did, frankly, more harm than good. As a result of the "clinical findings" and comments made whilst there, mealtimes have become a little more 'challenging' in our household. Luckily, despite what the 'professionals' who saw us may have thought, we do serve suitable, soft chew items to J and here is the recipe that tempted him back onto his normal food during the last, rather long, week.
This is a simple recipe that has been little changed since my mum showed me how to make it before I headed off to live life as a student. Chef J has added Lea & Perrins Worcestershire Sauce into the mix prior to cooking - this is a condiment which used to be added on the plate.
To make it you will need:-
450g mince (we use pork)
One large onion, chopped and sweated
One large or two medium eggs
Sage (2tsp dried, or a handful of freshly chopped)
Lea & Perrins Worcestershire Sauce (about three tablespoons)
Freshly ground black pepper
Sunflower oil (for frying)
Chop the onion and fry in sunflower oil until translucent. Whilst the onion is being cooked, prepare the mince in a bowl by combining it with the egg(s) and other ingredients.


Next, the mince, egg and seasonings have the sweated, chopped onion added and it's given a good mix to ensure everything is coated in the egg. As you can see, we use spoons to portion up the mixture before placing them in a frying pan to cook. They're cooked in a stainless steel pan which has been heated and is coated with sunflower oil.
 Sous chef J managed to get this pic of them sizzling in the pan... once they'd been carefully turned using an 'old fashioned' steel fish slice that was my Nana's!
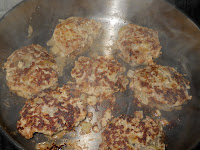 The rissoles are usually eaten as soon as they are cooked... but the mix can also be formed into rolls before cooking and then, once cooked, cooled and used in a picnic.
 NOTE: I often make up twice the quantity of this and freeze half before the cooking stage. Defrost thoroughly and cook as above ... makes an easy meal at the end of a busy day.
 We decided to make some Easter Egg Nests and found this easy recipe online... http://www.bbc.co.uk/food/recipes/eastereggnests_93841
 Following the recipe, we then heated all the ingredients apart from the rice pops in a bowl over a pan of boiling water. The chocolate mix smelled as good as it looked!


 The Mini Eggs were added and then the nests were ready to go in the fridge.
  The result will be shared with our pals tomorrow... and we're pretty sure they won't last long!


