Showing posts with label snack. Show all posts

Friday, 13 May 2016

Biscotti


This is such a simple recipe... do give it a go, the ingredients you'll need are -

90g Plain Flour (we used Dove's Farm gluten free)
50g caster sugar
1 teaspoon baking powder (we used Dr Oetker gluten free)
1 egg
1/2 teaspoon vanilla extract
40g pistachio nuts
25g dark chocolate chips/chunks

We mixed the first three ingredients together in a bowl. 

Next, the egg was lightly beaten and the vanilla extract was added to it.  This egg mix was then poured into the dry ingredients and thoroughly combined by hand. (just use one hand to 'squish' it together, it will form a dough after a while - if it's over dry, just add a little water a couple of drops at a time)

Once it was formed into a dough, it was time to add the nuts and chocolate chips.

Finally the dough was placed on a silicone sheet on a baking tray and placed in a pre-heated (160ºC fan oven) for 10 minutes.  We checked it at this point and, as it was still soft in the thickest part, returned it to the oven for a few more minutes before checking and removing to cool.

Having allowed the biscotti dough to cool for about 15 minutes, it was moved to a chopping board and sliced (using a sharp knife) into 1cm thick slices.

The slices we returned to the baking sheet and cooked for a second time in the oven... after about 5 minutes, we turned the oven off and allowed the biscotti to dry using the oven's residual heat.  (take care not to burn your biscotti - set a timer to remind you!)

Beware - the Biscotti are very more-ish and are great with a coffee or a cuppa.  Enjoy.

Thursday, 29 January 2015

Almond Red Pepper Dip from The Wheat Belly Cook Book

We were asked if we'd like to review the Wheat Belly Cookbook by Dr William Davis and jumped at the chance... it's always good to get a look at new recipes and were delighted, on the first flick through, to find 4 recipes we liked the look of.  This is the sign of 'our sort of book'... we are always keen to find new, simple, recipes.

The first recipe from the book we liked the sound of was Almond Red Pepper Dip.  For this we needed -
1 jar roasted red peppers, drained well
24g flaked almonds, toasted
40g parmesan cheese, finely grated
1 Tbsp balsamic vinegar
1 garlic clove
Pinch of ground red pepper (we didn't have any)
1/8 tsp sea salt
1/8 tsp ground black pepper

Putting the first five ingredients in our mini blender, they were whizzed together until smooth.


Seasoning was then added and the dip was served with lettuce leaves, celery sticks and cucumber slices.

This was a really easy-to-make and tasty recipe.  Sous Chef J enjoyed his dip with some spicy potato wedges.

The recipe was judged to be a "real hit" as it was super-tasty and was made using store cupboard ingredients.  It's definitely a dish that will be made more than once!

Looking more closely at Dr Davis's Wheat Belly Cookbook, it has two parts - Part One deals with Health, Weight and Life the Wheat Belly Way and Part Two is the Recipes.

In his introduction, a statement that caught our attention was ".. to help you recreate delicious foods without wheat and without the rice starch, cornflour, potato flour and tapioca starch of commercial gluten-free foods.  The recipes presented herein are tasty, don't screw with blood sugar, don't trigger appetite and are truly healthy - a novel concept!"  Seeing as we're all about cooking from scratch and finding simple, easy to prepare food, this sounds great. 

Reading, quite swiftly we admit, through part one we were provided with a good overview of what the Wheat Belly diet aims to address, why Dr Davis thinks this is necessary and how to assemble the goods/ingredients needed to follow the regime he recommends.  As was said at the start, when looking through part two, we found a number of recipes which caught our eye and were marked for making.  It's a book we'll enjoy reading and referring to and will definitely be trying out more recipes as we continue to 'cook from scratch'.

Disclosure - we were sent a free copy of the book but were not required to write a positive blogpost.  The opinions are our own.  We were not paid for this post.

Friday, 23 May 2014

Kabuto Gluten Free Noodles

When we heard about the gluten free pots of @KabutoNoodles on twitter and were offered some to try, we were keen to see what they were like.

The parcel arrived and there were three pots each of Miso and Chicken noodles. 

Sous Chef J decided we'd try the Miso pot first...
...opening the pot, there looked to be a small portion of rice noodles and we topped up the container as instructed.

After stirring well (we recommend using a fork for this), the foil lid was placed back over and the noodles were left to 'brew'...

...three minutes later, we decanted the now-much-bigger noodles into our bowls and gave them a try.
 As we're fond of saying here "actions speak louder than words..." so this pic of Sous Chef J's bowl (yes, he did use a fork!) shows what he thought of the noodles.  

There were plenty of noodles and the miso was very tasty.


A pot of Kabuto Noodles made a great take to work lunch for B... and as they're easy to store, they're a handy 'just in case' addition for us too.


At the moment, Ocado stock the gluten free noodles (£1.99 a pot), as do Whole Foods London.   Also, independent stores are stocking the noodles...

We did look for the noodles in the supermarket but our local Sainsburys only stocked the gluten-containing Kabuto Noodle pots (so beware when looking in stores)... but, perhaps one day soon, the Gluten Free pots will also be stocked?!

Disclosure - we were sent a box of noodle pots to try.  We were not required to write a blogpost and all the opinions are our own.

Thursday, 20 February 2014

Honey-roasted Nut Butter Brownies

Looking through the Waitrose Kitchen magazine whilst Sous Chef J was at a Minecraft club the other day, I spotted that the 'Star Bake' recipe for Honey-roasted  Nut Butter Brownies.  It caught my eye not only because it looked appetising but also because I thought it may 'convert' to gluten free relatively easily.  So, we gave it a go - although we only made half the quantity the original recipe was for...

So, the ingredients we used were -

125g mixed nuts
1 tsp honey
½ tsp salt
70g unsalted butter
125g dark chocolate chips
100g caster sugar
¼ tsp salt
½ tsp vanilla extract
1 large egg, lightly beaten
100g Self Raising flour (we used Doves's Farm gluten free)


The nuts were roughly chopped then put on a baking sheet and into a 200ºC oven for four minutes to brown (use a timer... they'll burn if left too long)  Then the honey and seasalt were mixed through before returning the sheet to the oven (temp lowered to 180ºC) for a further two minutes.  Once removed, the nuts were left to cool.

Putting 100g of the chocolate and the butter in a pan, they were heated until fully combined.  Then the sugar, salt and vanilla essence were whisked in before adding the eggs and mixing through.  Finally, the flour was added and mixed until smooth.  At this point 37.5g of the nut mix was stirred through and the mix was poured into a greased and lined baking tray (we made a tray out of parchment, about 7" square or 17cm x 17cm).

The brownies were cooked for about 20 minutes and checked... they were removed from the oven when still slightly soft in the middle as we like a softer brownie texture.  Once taken out of the oven, they were cooled in the tin for 5 minutes before being removed and allowed to cool fully on a cooling rack.

Whilst the brownies were cooling, the remainder of the honey-roasted nuts were placed in our small food processor bowl and blended (takes quite a while) until they became a butter.  

Once the brownie was cool, the nut butter was spread on top and smoothed out.


To make the chocolate drizzle topping, the remaining chocolate drops were placed in a small freezer bag which was covered in hot water and left to melt for a few minutes.

Having melted the chocolate in the bag, a small snip across the corner of the bag was made and the chocolate was drizzled across the brownies.

Finally the brownies were cut into small squares ready for eating.

Friday, 12 July 2013

Tuna, Walnut and Grape Salad

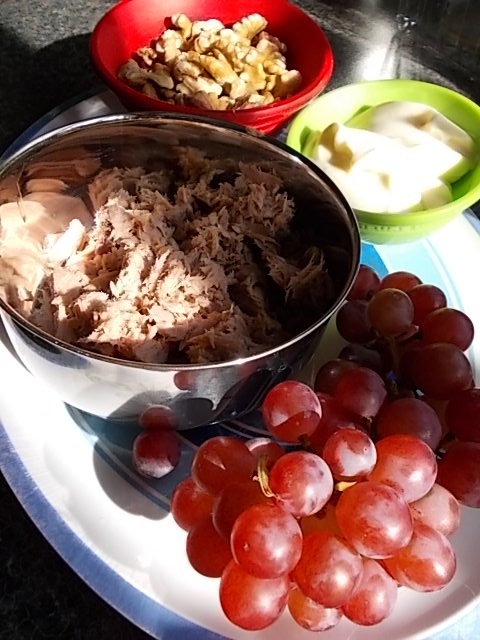
As the title suggests, this is a tuna salad with grapes and walnuts.  Added to the 'mix' is some mayonnaise to bind things together but, apart from a generous twist of freshly ground black pepper, it's a simple dish to make.

Ingredients gathered as follows - one 185g tin tuna (drained), a good handful of walnut bits (about 75g), a small bunch of seedless grapes (about 125g) and a large dollop of mayonnaise (we used 3 heaped dessert spoonsful)


The walnuts were roughly chopped and the grapes were halved (this not only makes them go further - a thrifty tip - but also makes Sous Chef J able to eat them more easily)


Having drained the tuna, the mayonnaise was mixed through and then the other ingredients were added and combined. 

Finally, seasoning with some freshly ground pepper and the salad was then ready to eat.  We served it with crisps and a green salad. 

It's a great dish for a packed lunch, goes well at a bbq and you can adjust the amounts/ratios of ingredients according to your taste or availability of ingredients.


Saturday, 29 June 2013

Curry Houmous

 Sous Chef J likes to eat finger food and dips are a particular favourite of his.  Up until now, we've had a bit of a stand off in relation to the tastiness (or otherwise in his opinion) of houmous.  However, bearing in mind that he likes all things yellow and mango chutney is good, we hit upon the idea of making a curry-style houmous dip.

We gathered the meagre ingredients - ready made houmous (we do make our own but this was for a speedy lunchtime 'solution'), a tablespoon of curry powder and a dollop of mango chutney.

The ingredients were combined and mixed well.  

Finally, the dip was served with tortilla chips... although we have used mini poppadums as dippers which work well too.

We now make it in larger amounts, then halve the batch and store one lot in an airtight container in the fridge for up to two days.
Give it a try and let us know what you think!

Sunday, 24 March 2013

Cheesy Rarebit


The other day we needed something tasty and speedy for lunch... an offer of cheese omelette had been made to Sous Chef J but was rejected.  So, thinking quickly, and re-packaging the ingredients we had to hand, I suggested Cheesy Rarebit... which was accepted.

So, we took the bread (we used Genius Gluten Free Seeded), eggs, cheese and black pepper and set up our 'production line'.  Sous Chef J laid the bread out on the grill pan and was in charge of toasting.  I grated the cheese and beat the eggs.

The cheese was added to the beaten and seasoned eggs.


Once the toast was ready, the eggy cheese mix was spooned on... the tray of the grill pan had been covered with a silicone sheet to make it easier to clean 'in case of spillages'.


The whole lot was placed under a hot grill for 2-3 minutes (with the timer set to ensure we didn't forget) until the Rarebits were ready...

... and very good they were too.  

Wednesday, 13 March 2013

Fruit and Nut Bar

Sous Chef J has been losing weight... not a good thing when you're "a growing lad" so, in conjunction with a trip to the dentist who said "don't eat sugar" and the GP who said "eat healthy fat and calorie containing foods" we needed ideas.  Calorie filled food, that's not bulky, has the 'right' texture and doesn't have too much (if any) sucrose within.  Nut bars came to mind... with fruit... and perhaps a drizzle of dark chocolate.


We assembled 200g mixed nuts, 100g mixed fruits, 75g dessicated coconut, 90ml apple juice, some pumpkin seeds and a sprinkling of sunflower seeds.

The nuts we used were pecans, walnuts, flaked almonds and hazelnuts.

It was a simple matter of putting all the dry ingredients in the food processor, pulsing til chopped and then adding half the apple juice and blending.  Once the mix was starting to come together, it was turned out into bowl and mixed, by hand, with the remaining apple juice.

A ready greased baking sheet was then covered with the mix, it was flattened out as evenly as possible, scattered with flaked almonds and sunflower seeds.  The bars were marked out into the mix before the tray was placed in a 180ºC oven to bake for 10-12 minutes.  The length of time it will take to bake depends on the size of tin used/thickness of your mix so you'll need to check.  If you add nothing more to than this to the bars then, when they come out of the oven, they make a good sugar free snack.

However, Sous Chef J liked the idea of drizzling chocolate over the top.  So he melted a handful of dark chocolate pieces in a bowl and then 'artfully' covered the top of the bars, whilst still on the baking tray, with the chocolate.  The bars were left to cool on the tray for 10 minutes before being moved to a cooling rack to cool completely.

YUM!

The cooled bars were stacked in an airtight container and will last for a few days - assuming Sous Chef J doesn't eat them all before then.

You can make these bars using your choice of nuts, fruits and liquid - you can use nut milk, coconut milk or other fruit juice to make the dough... it's up to you.  Have fun, try different mixes and see which you like the best.